Drawing is an excellent way to capture the view through the telescope. It is much more suitable than the simple description in words. Moreover you will recognize very fast that the perception of fine detail increases enormously. When drawing you will observe longer and more carefully, because you don't want to draw something wrongly. Thus you perceive more details automatically! Remembering the observation is also much easier than with a bare description in words.
Many stargazer flinch from doing a drawing because it seems them too difficult or they feel they have not the necessary talent. In most cases both is incorrect! But as with many things practice helps a lot! With some practice drawing becomes quite easy and you will achieve good results!
In the following I want to deal a little more exactly with my techniques.
The basis of all drawings is the rough sketch made after thorough observation at the telescope. It needn't be pretty, but however must contain all details, which are visible. The draughtsman is the only one who needs to deal with it! She/he must know what is behind the symbols. Edges may be emphasized with bolder lines, fading may be drawn by a zigzag line. Brighter areas are shaded darker. Short notes may also be very useful. Wrongly placed stars will be crossed through, do not erase on the wet paper! It is also important to make the drawing large enough to put in all details. Better too large than too small!
Despite of making the drawing you should make a description, it helps a lot when making the drawing.
|
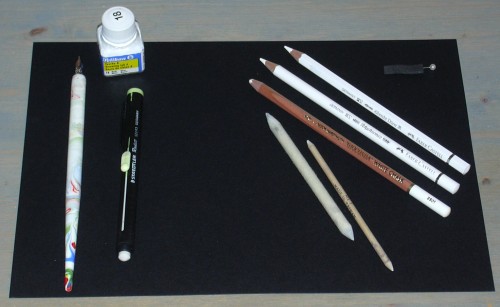
| All, necessary for sketching |
The fair drawing should take place quite soon after the observation. At best on the day after the observation. I use black tone paper (160g/m²) and a chalk pencil. The paper should be very smooth. At first I draw the outlines quite tenderly and fill the surface. The next step is wiping. That for I use a stump (paper wiper). These are small roll of paper which is pointed at the end. Move it in small circles or perpendicular to the lines. The wiper absorbs many particles of the chalk with which faint nebulae may be drawn very easily. You can rub the chalk with a soft eraser, crayon should not be erased. Brighter areas get some more chalk and are wiped again. If an area gets too bright just wipe more. Don't forget to clean the stump on another sheet.
I also use crayons for very detailed, small objects. They may be wiped only very little but you can draw fine detail. I use the often recommended Polychromos from Faber Castell. For labelling an even harder crayon should be used. I use the Albrecht Dürer from Faber Castell.
Stars are drawn with white indian ink and a very thin pen. This looks much more pretty than drawing the stars with crayons. Another very easy way to draw stars are white gel pencils!
Very large objects or larger fields with several objects my be drawn into a printed star chart. That saves much time and the stars have their exact positions. When transferring the stars all stars will be perforated with a pin. Afterwards the sketch is attached to the black paper and one through-prints all stars with the indian ink. Subsequently, the stars are painted on the size corresponding to their brightness.
The finished drawings are scanned at 300dpi. Afterwards, the drawing is smoothed with a median filter of 3 pixel size. In few cases some contrast adjustment are made. As last step they are down-scaled and stored as *.jpg.